Installing Paprika on Ubuntu 16.04 using Wine
07 May 2020
Today I installed the recipe manager Paprika on Ubuntu 16.04 using Wine. It is my first time installing an application with Wine and before I forget how I did this, I wanted to make a quick note of the steps I took.
With a quick search I found a couple of forum posts [1,2] discussing a Wine installation of Paprika. I couldn't get the suggested solutions from these posts to work, instead the method I had success with is described here.
I first downloaded the Windows Paprika installer from the app's website. I then installed Wine following the instructions for Ubuntu 16.04
sudo dpkg --add-architecture i386
wget -O - https://dl.winehq.org/wine-builds/winehq.key | sudo apt-key add -
sudo apt update
sudo apt install --install-recommends winehq-stable
To get some dependencies I also got winetricks. I just left the script in home folder and removed after the installation.
wget https://raw.githubusercontent.com/Winetricks/winetricks/master/src/winetricks
chmod +x winetricks
I then ran
winecfg
and confirmed that the Windows version is set to Windows 7.
Installing these dependencies took a long time, and I'm not sure if all of this is necessary, but this is the configuration that worked for me. I'm using here the winetricks script I downloaded earlier.
./winetricks allfonts
./winetricks dotnet472
./winetricks fontsmooth-rgb
Finally, I was able to install Paprika via
wine msiexec /i ~/PaprikaSetup.msi
After the installtion, the application can be run via
wine "c:\Program Files/Paprika Recipe Manager 3\Paprika.exe"
It doesn't look perfect, but I'm happy enough with it!
Redshift
I quickly noticed that the Wine application collides with Redshift. When Paprika is started or, for example, the window is resized, screen gamma is changed. This interferes with Redshift's settings and leads to switching between different brightness settings. Here as well a solution is well documented.
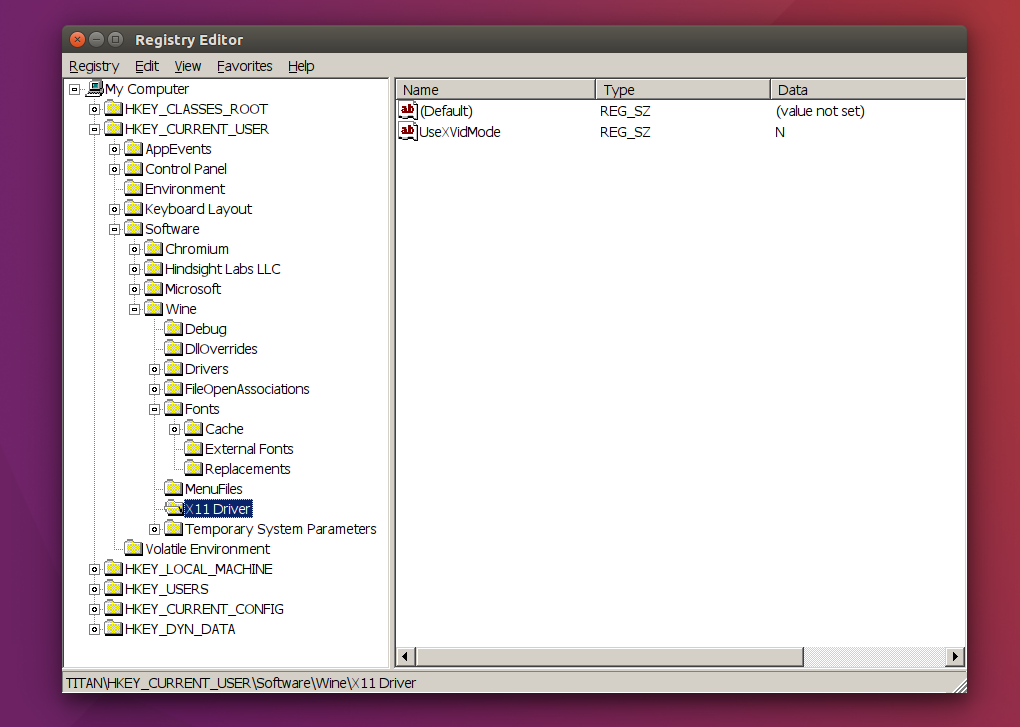
Start the registry editor with
wine regedit
and in HKEY_CURRENT_USER\Software\Wine\X11 Driver (you might need to create this key) set UseXVidMode to N, as shown in the screenshot below.
Suggestions, comments or improvements on this? Please let me know!